Becoming a Clipboard Gymnast
For those who are new to the shell, we've covered a lot. In this chapter we'll slow down the pace of new commands a bit and instead focus on a core skill which you will already be familiar with from Graphical User Interfaces - using the clipboard.
You have probably already been using the clipboard with the shell, copying and pasting commands and their outputs. However, there's a lot more we can do with the clipboard. Now we'll look at how to take this to the next level.
We'll also briefly introduce introduce aliases and pipelines, which will be covered in a lot more detail in later chapters.
The Clipboard Essentials
I wouldn't be surprised if the keyboard shortcuts to access the clipboard are already firmly locked into muscle memory for almost all readers, but just in case, here's a reminder of the shortcuts across different systems:
| Command | Windows Shortcut | Linux Shortcut | MacOS Shortcut |
|---|---|---|---|
| Cut | Ctrl + X | Ctrl + X | ⌘ + X |
| Copy | Ctrl + C | Ctrl + C | ⌘ + C |
| Paste | Ctrl + V | Ctrl + V | ⌘ + V |
In the shell, you may find that these commands don't run as expected. For example, in the screenshot below I have tried to use Ctrl + V a few times to paste into terminal on Ubuntu:
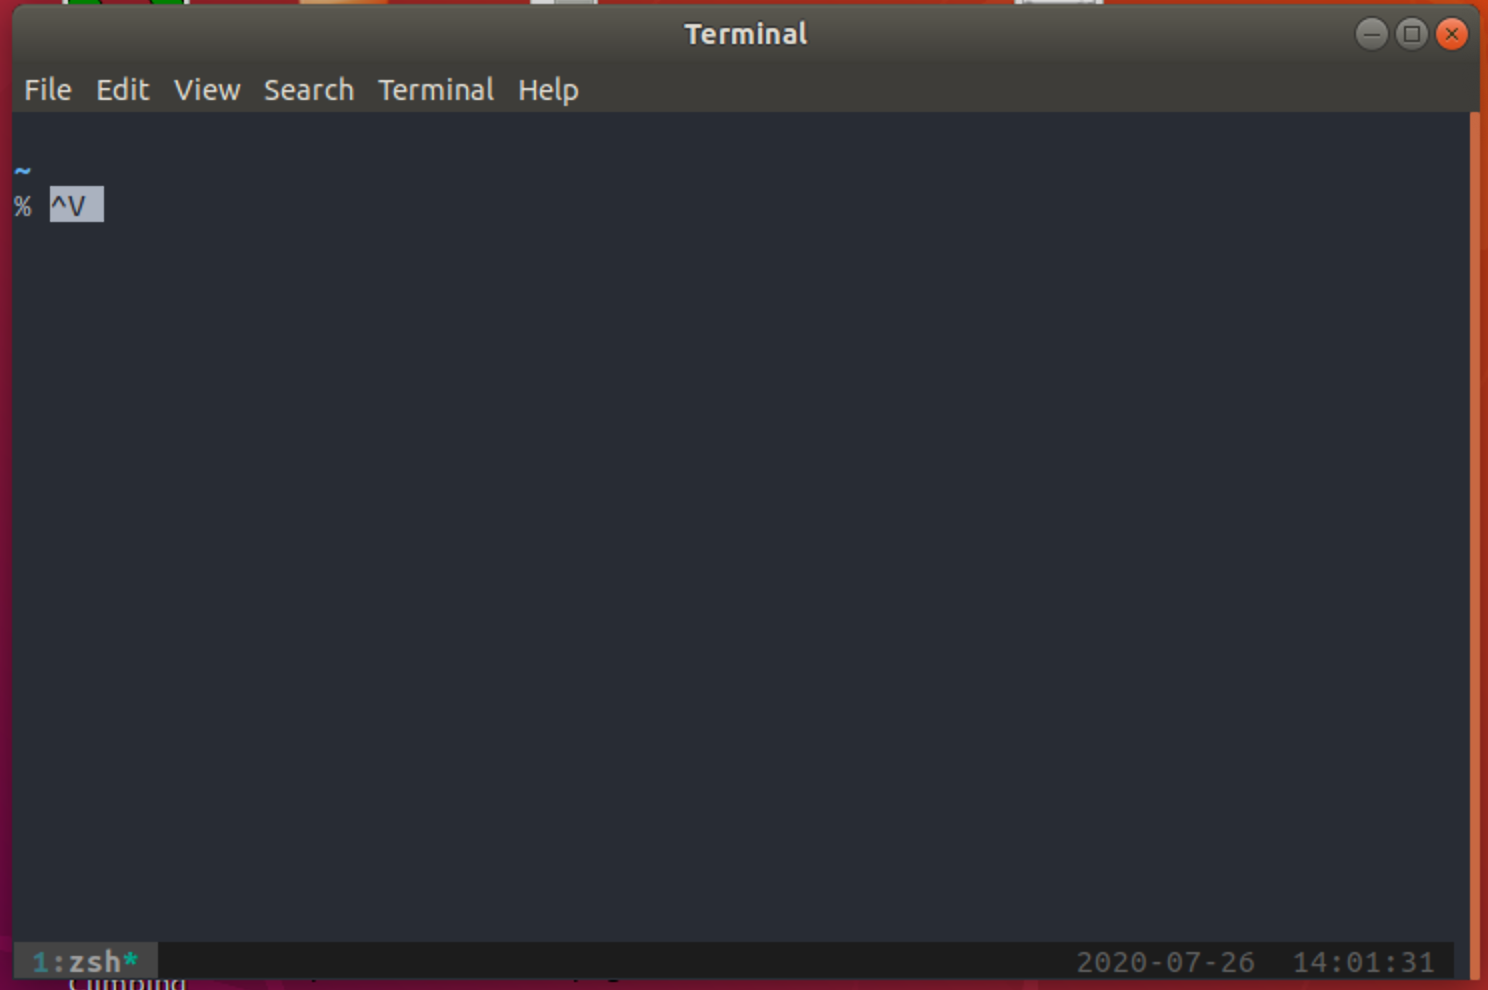
Instead of the contents of the clipboard being dropped into the shell, we see the text ^V. Why is this?
Well, some of this is historical (the shell has been around for a long time so we'll see this answer a lot!). The reason the Ctrl key is called the Control Key is that it is used to send control sequences to the computer. When we're using the Control Key, the characters we send are not plain text, they're used to perform actions. This is something that is probably pretty familiar. For example, Ctrl + P is almost universally used as a shortcut for the 'Print' command.
We tend to think of these commands as shortcuts to save us from finding the appropriate command in a menu or on a toolbar. But of course most shells and command-line interfaces pre-date graphical user interfaces. They needed a way to differentiate between a user entering plain old text, and a user wanting to execute a certain command.
Even modern shells tend to follow the conventions around control sequences which were established by earlier ones to ensure a consistent experience for users who are used to working with shells. Shells have a whole bunch of control sequences which actually pre-date the graphical user interface, the clipboard itself, and even screens!
Some of the control sequences used in the shell you might already be familiar with. For example, if you have a program running and want to cancel it, you might be used to using Ctrl + C. This actually sends a signal to the program and typically the program responds by closing. We'll see signals again and again as we go through the book.
The Ctrl + C combination terminates the current program. What about Ctrl + V? This is the grand-sounding "Verbatim Insert" command. It tells the shell to write out the next keystroke you give it. This allows you to write out 'special' characters like the escape key, left or right keys, or even the Ctrl + V combination itself.
So if you type Ctrl + V twice, the shell writes out the text ^V. The hat symbol ^ represents Ctrl. The first command tells the shell to write out the following command, the second is then written out directly. You can try writing out some different sequences. You'll see various odd looking symbols drawn, which represent things like the Alt key and other special keys.
So why do we need to care? Well the shell already has a command for Ctrl + C and Ctrl + V, so we're going to need to work around this to use our familiar 'copy' and 'paste' commands.
How this works varies across platforms. Follow the instructions below for the platform you are using.
Windows
If you are using a Command Prompt, then the usual shortcuts will work fine. However, most of the time we will be using Bash. In this case the shortcuts will not work. Instead, select the Use Ctrl+Shift+C/V as Copy/Paste option from the properties menu:
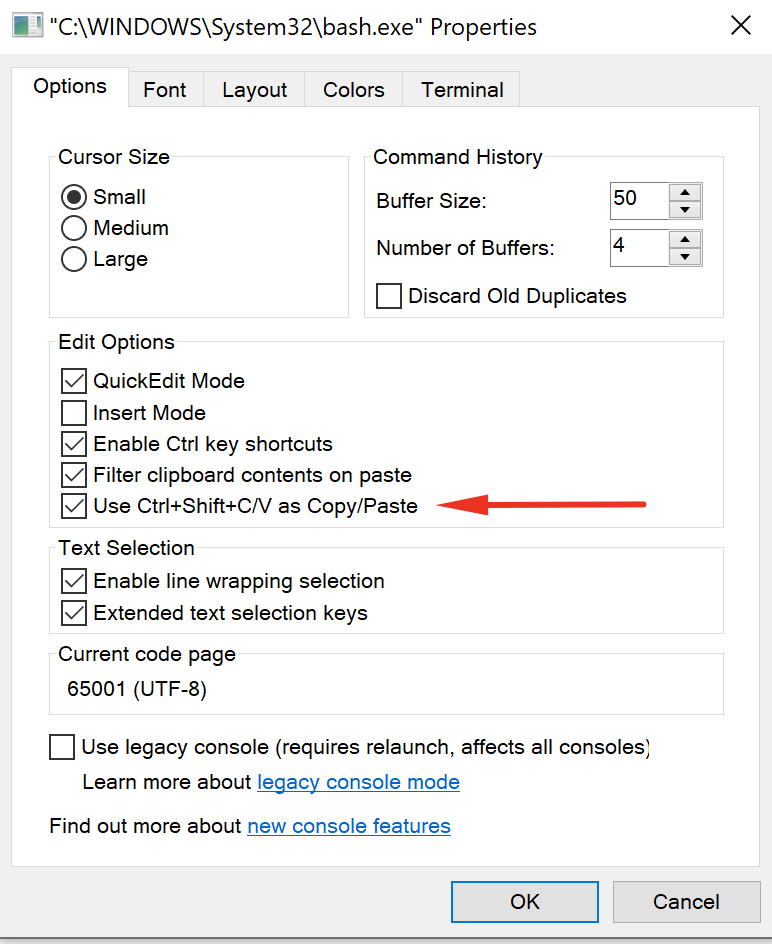
You can now use Ctrl+Shift+C for copy and Ctrl+Shift+V for paste. You can also copy text by just dragging the cursor over it with the right mouse button.
Linux
On most Linux systems you'll be using the Gnome terminal, which means that you can use Ctrl+Shift+C for copy and Ctrl+Shift+V for paste. You can also right click on text with the cursor to select it.
MacOS
Mac users can just use ⌘ + C for copy and ⌘ + V for paste. The shell doesn't use the special Mac Command character ⌘, which means the default keyboard mappings on MacOS work fine in a shell as they do not clash with anything.
Now that we've got the basics out of the way, and learnt far more than we probably wanted to about control keys, we can look at more ways to use the clipboard.
Preparing the Clipboard Commands
Copying and pasting text to and from the clipboard is useful, but there's a lot more we can do. With a couple of basic commands we can hugely expand what we can do with the shell and make a whole set of everyday tasks far easier to accomplish.
There is one small complexity we'll need to work through before we continue. The complexity is that the clipboard is accessed in different ways on Windows, Linux and MacOS. I'll first show you how to deal with this, just follow the instructions for the platform you are working on.
To make things easier for the reader I'm going to assume you have created the pbcopy and pbpaste commands by following the instructions below. I am creating these commands so that regardless of the platform you are using the tutorials will work in the same way!
Windows
Assuming you are using WSL, you will need to run the following two commands. By the time this book is published there may be a cleaner way, but for now this is a workaround for some limitations on the WSL system:
alias pbcopy='clip.exe'
alias pbpaste="powershell.exe -command 'Get-Clipboard' | tr -d '\r' | head -n -1"
Don't worry about how these commands work - by the time you've gone through the book it should make perfect sense. For now you just need to know we're adding two new commands to our toolkit - pbcopy and pbpaste, which will work in Bash on Windows.
Linux
Hopefully if you are Linux user the commands below will seem familiar. They install the xclip program and create shortcuts to copy and paste. You absolutely don't need to do this if you prefer to call xclip directly, these commands are just setup so that across all platforms the tutorial looks the same.
sudo apt install -y xclip
alias pbcopy="xclip -selection c"
alias pbpaste="xclip -selection c -o"
MacOS
Nothing is required on MacOS - pbcopy and pbpaste are built in.
Making these changes permanent
We've used the alias command to create pbcopy and pbpaste. In Bash (and most shells) an alias is something you can configure as a shortcut to avoid having to type longer commands. There's a whole chapter on commands in Section 2.
These instructions will need to be repeated when you re-open your terminal. In a later chapter we'll see how to make permanent customisations to our shells so that we don't have to repeat this setup.
We'll also see later on how to create configuration which works across many different platforms, so that you can use the same configuration regardless of what platform you are working on. This is very useful if you work across multiple machines or operating systems!
Copy and Paste Basics
Now that we've created these commands, we can use them to access the clipboard. For example, if I copy the following text:
Kirk Van Houten
Timothy Lovejoy
Artie Ziff
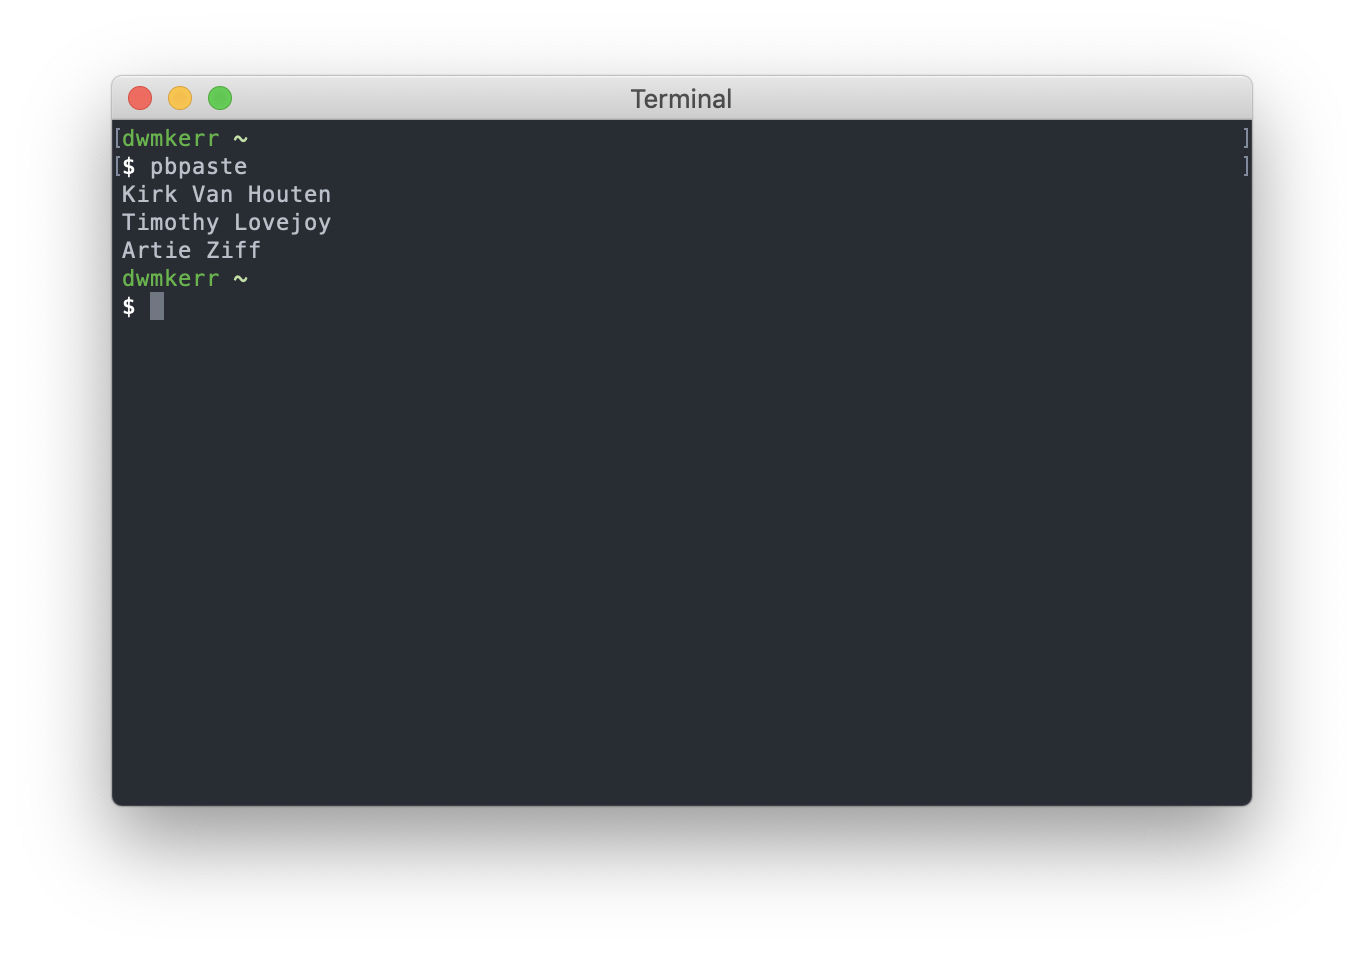
Then I can paste it into the shell with the following command:
pbpaste
And we'll see something like this:
Copying is just as straightforward. If you have downloaded the Effective Shell 'samples' folder you can see we have a list of characters from "The Simpsons" in the file effective-shell/text/simpsons-characters.txt. Now we could use the cat command to show the contents of the file, and then manually select the text and copy it. Even easier though is to just pipe the contents of the file to the pbcopy command:
cat ~/effective-shell/text/simpsons-characters.txt | pbcopy
The output will look similar to the below (I've included the output of cat for reference as well):
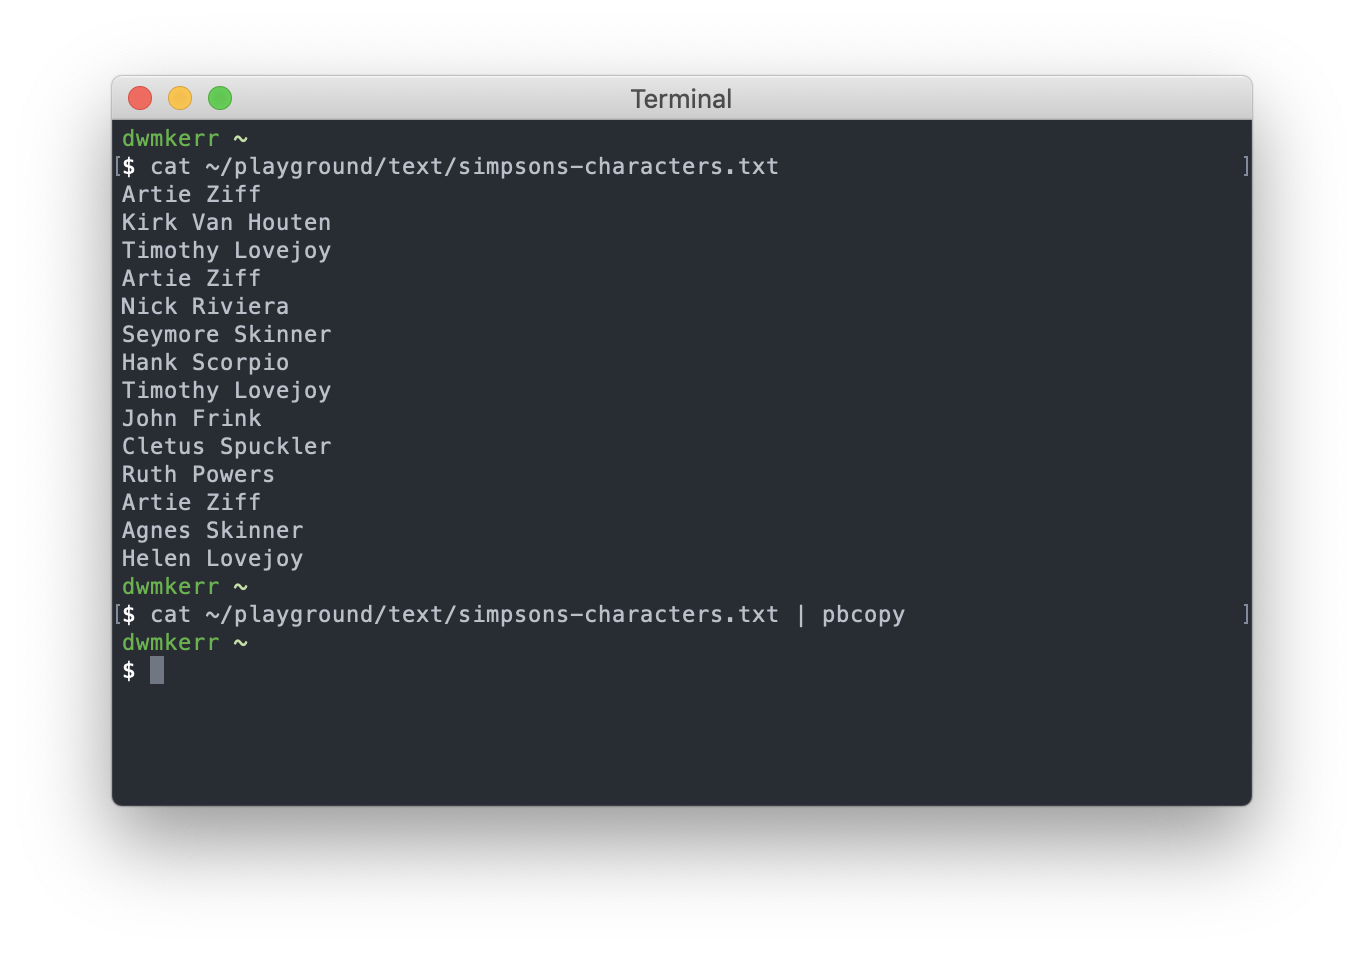
The vertical bar | is the pipe operator. It tells the shell to take the output from the command on the left and send it straight to the input of the program on the right. We're going to see a lot more of the pipeline operator as we continue. For now it's enough to know you can use it to 'chain' commands together.
This might not seem super useful so far - but if the text file was a lot larger then it would be much harder to cat it out, use the mouse to select all of the text (scrolling up through the window) and then copy it. And if you didn't have a mouse, it would be even more tricky. We're aiming to be as effective as possible when using the shell so being able to use the keyboard quickly for common tasks is critical.
Now we can see some real world examples of how these commands can be useful in daily tasks!
Removing Formatting
Don't you hate it when you have to copy formatted text and don't have an easy way to paste it as unformatted text? Here's an example, I want to copy this Wikipedia page on 'bash', and paste it into a Word document:
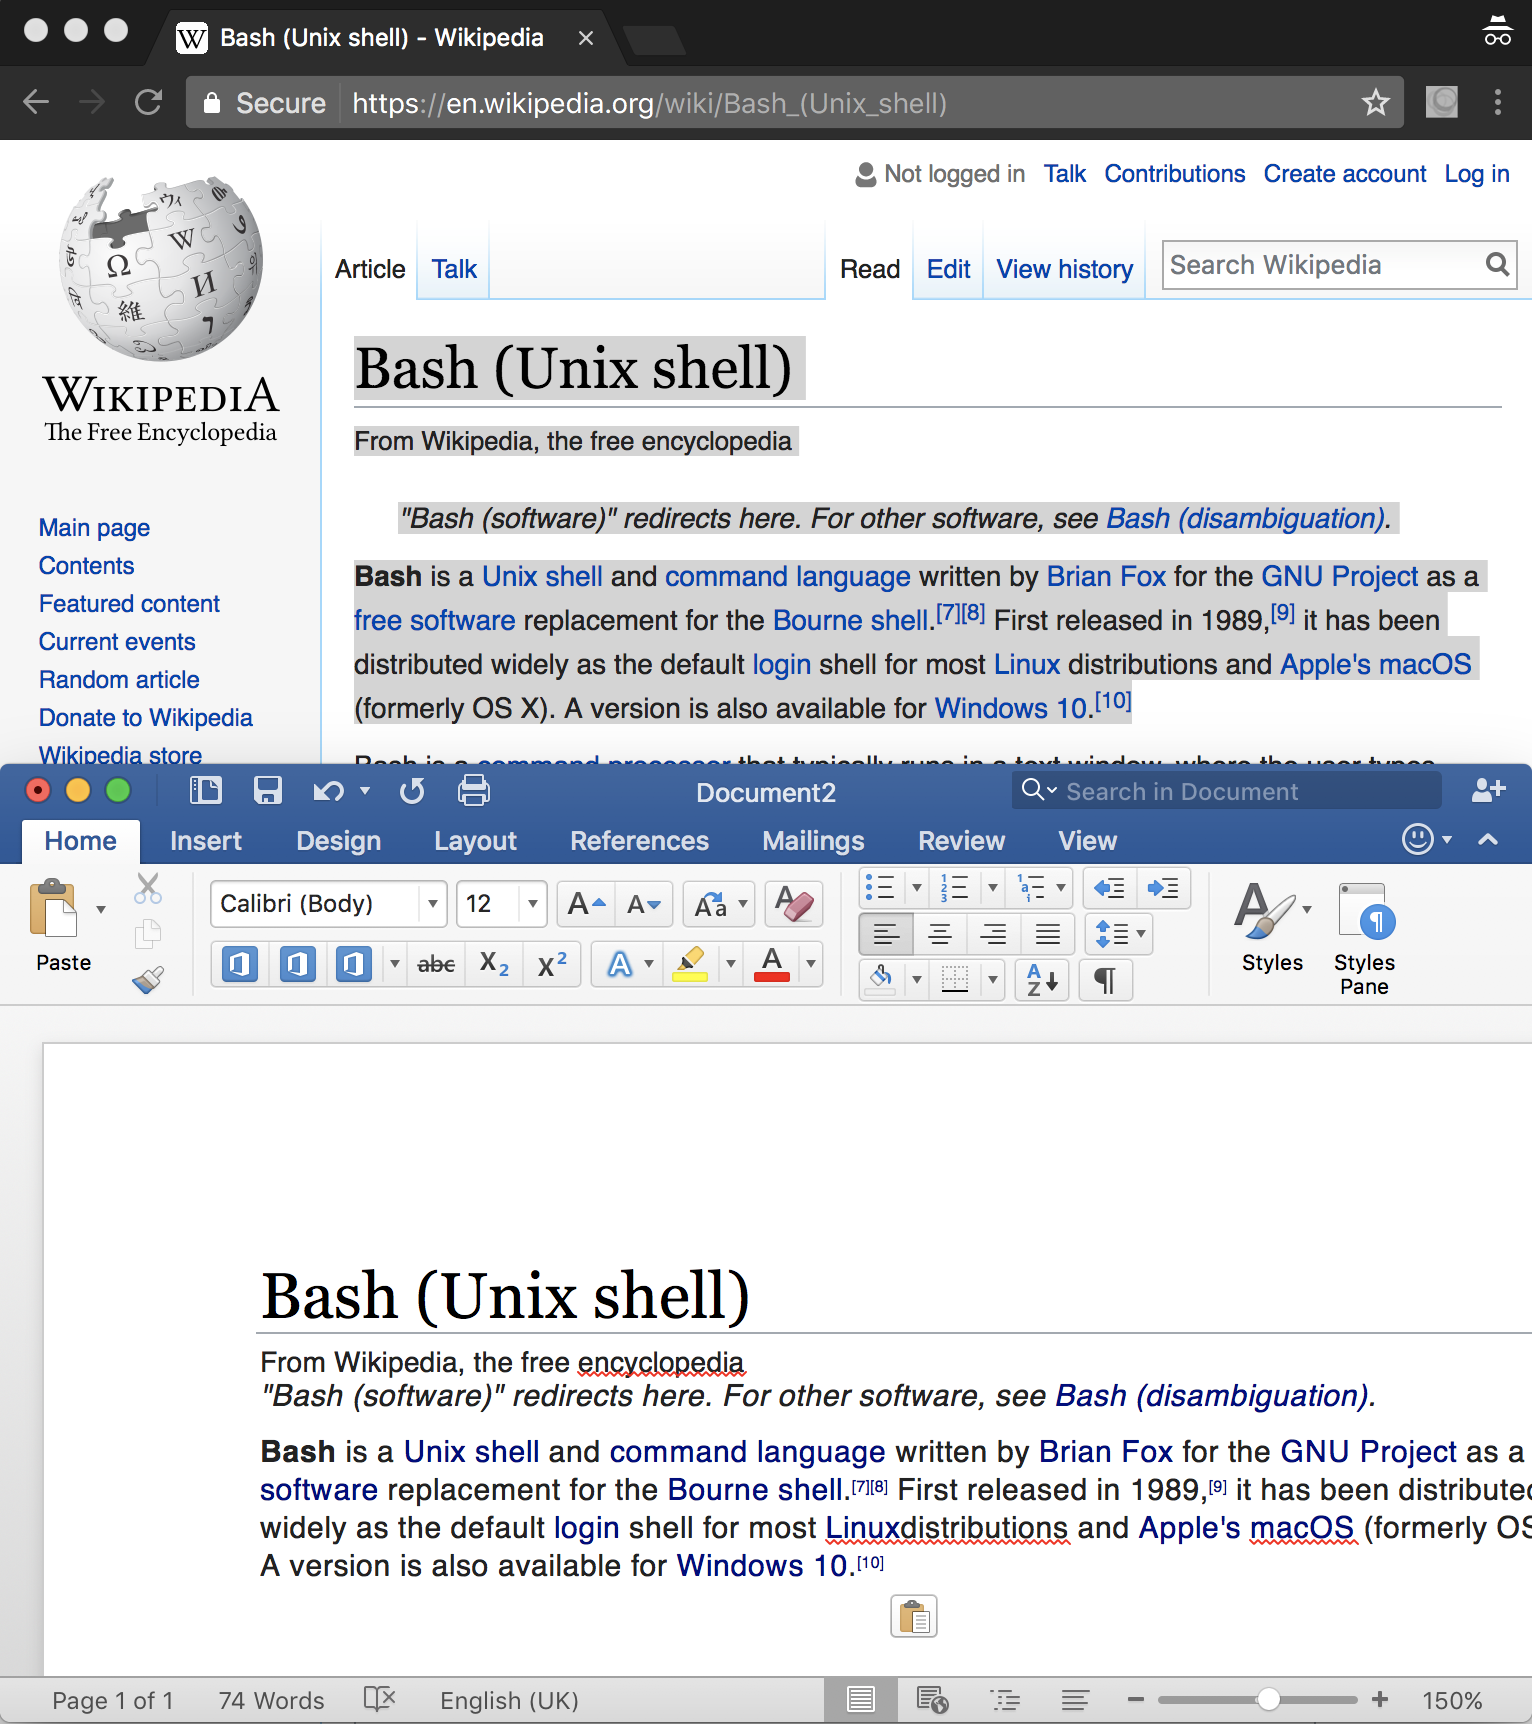
Many programs have a shortcut to paste the contents of the clipboard (such as 'command + shift + v') but if you are like me you might find yourself pasting into a plain text editor just to copy out the plain text.
If you just run the command pbpaste | pbcopy, you can easily strip the formatting:
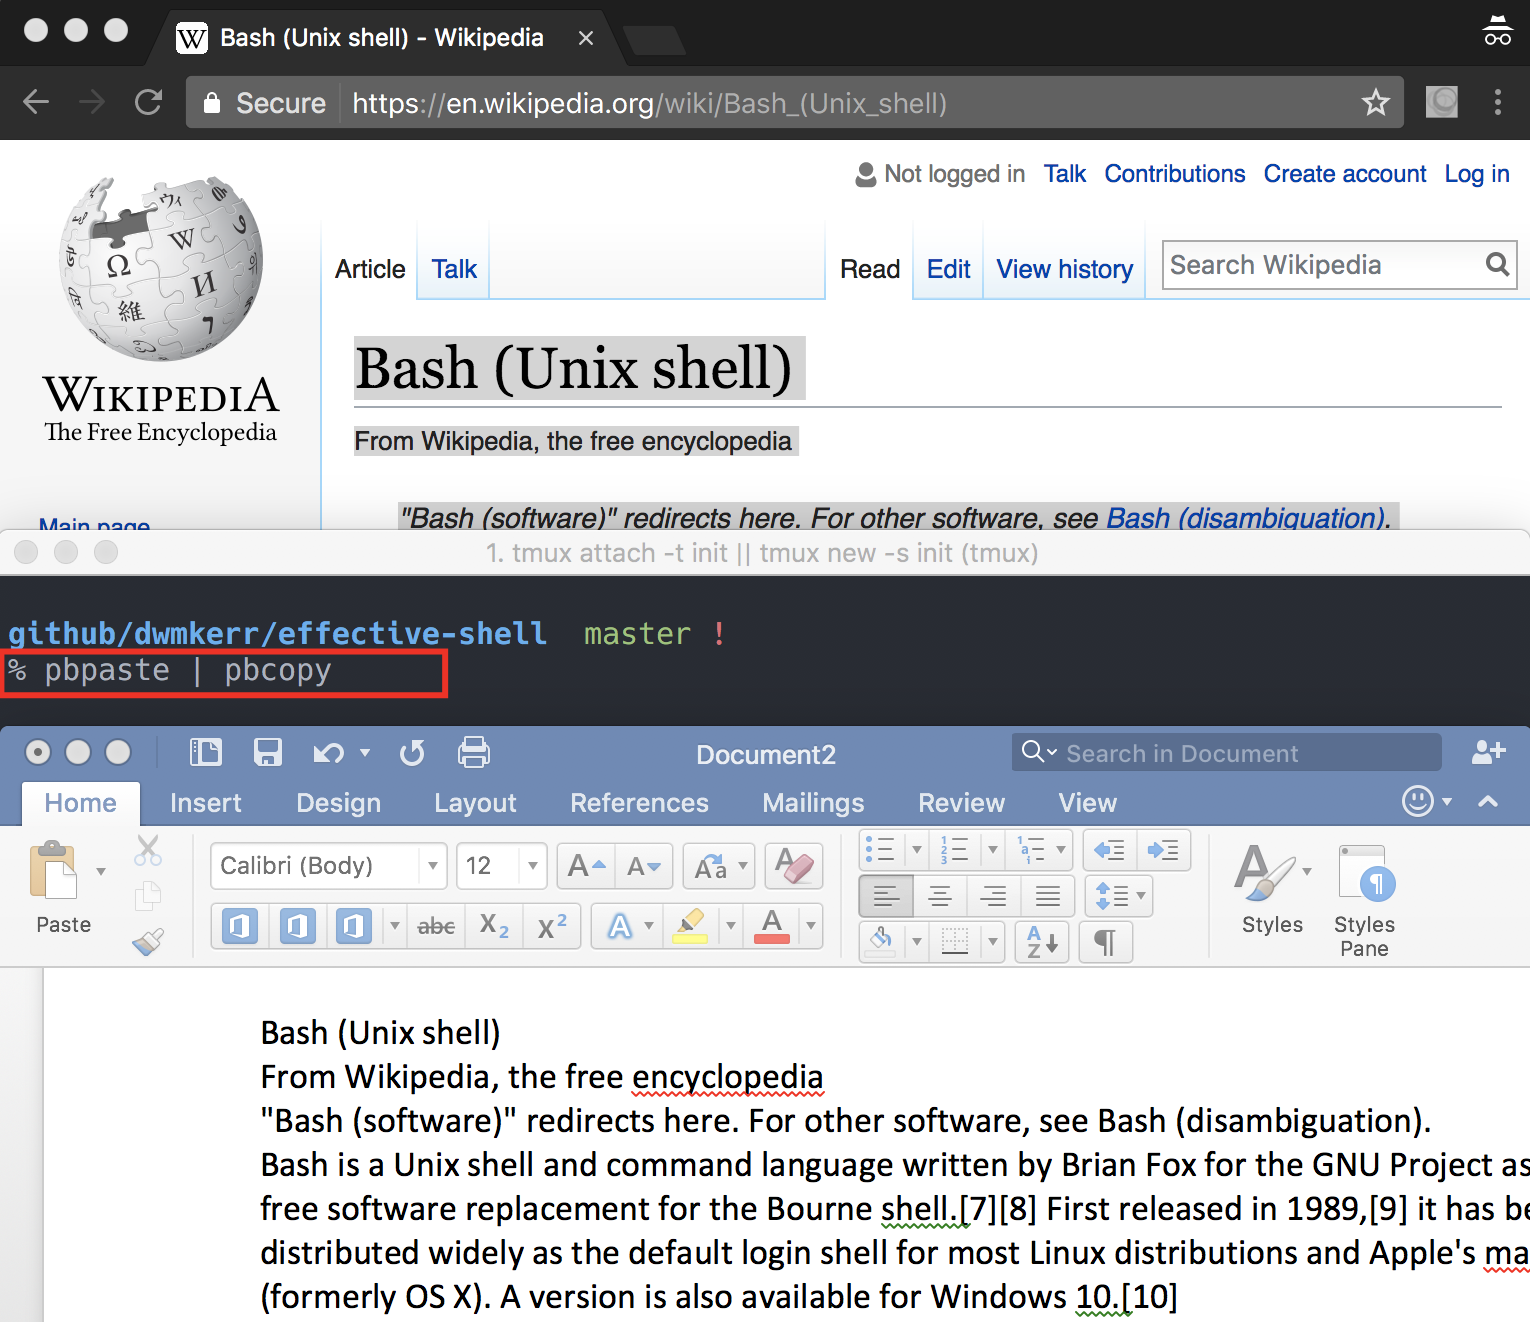
We're just piping out the clipboard (which ends up as plain text, cause we're in a terminal!) and then piping that plain text back into the clipboard, replacing the formatted text which was there before.
This little trick can be very useful. But we can use the same pattern to quickly manipulate the contents of the clipboard in more sophisticated ways.
Sorting Text
Because we can pipe the contents of the clipboard to other programs, that means we can easily use the huge number of tools available to us to work with text.
Let's take another look at the list of characters we have in the ~/plaground/text/simpsons-characters.txt file:
$ cat ~/effective-shell/text/simpsons-characters.txt
Artie Ziff
Kirk Van Houten
Timothy Lovejoy
Artie Ziff
Nick Riviera
Seymore Skinner
Hank Scorpio
Timothy Lovejoy
John Frink
Cletus Spuckler
Ruth Powers
Artie Ziff
Agnes Skinner
Helen Lovejoy
We can easily take this text, sort it and then directly copy the results:
$ cat ~/effective-shell/text/simpsons-characters.txt | sort | pbcopy
The contents of the clipboard will now contain:
Agnes Skinner
Artie Ziff
Artie Ziff
Artie Ziff
Cletus Spuckler
Hank Scorpio
Helen Lovejoy
John Frink
Kirk Van Houten
Nick Riviera
Ruth Powers
Seymore Skinner
Timothy Lovejoy
Timothy Lovejoy
The sort command has lots of different options but the defaults work fine for this case. We can see we've got quite a few duplicates - now we can move onto how we'd handle that.
Manipulating Text
Let's say someone has emailed me a list of people I need to invite to an event:

The problem is:
- The list is in Excel and is formatted
- The list has duplicates
- I need to turn each name into an email address like 'Artie_Ziff@simpsons.com'
I want to email get the email addresses on my clipboard ready to paste into my email client quickly. We can quickly handle this task without leaving the shell.
If you want to try out the same commands and follow along you can copy the raw text below (don't worry if the commands are unfamiliar, we'll be seeing them again and again and breaking down each one in later chapters):
Artie Ziff
Kirk Van Houten
Timothy Lovejoy
Artie Ziff
Nick Riviera
Seymore Skinner
Hank Scorpio
Timothy Lovejoy
John Frink
Cletus Spuckler
Ruth Powers
Artie Ziff
Agnes Skinner
Helen Lovejoy
First, we copy the text to the clipboard.
Now we can paste and sort:
$ pbpaste | sort
Agnes Skinner
Artie Ziff
Artie Ziff
Artie Ziff
Cletus Spuckler
Hank Scorpio
Helen Lovejoy
John Frink
Kirk Van Houten
Nick Riviera
Ruth Powers
Seymore Skinner
Timothy Lovejoy
Timothy Lovejoy
Then remove the duplicates:
$ pbpaste | sort | uniq
Agnes Skinner
Artie Ziff
Cletus Spuckler
Hank Scorpio
Helen Lovejoy
John Frink
Kirk Van Houten
Nick Riviera
Ruth Powers
Seymore Skinner
Timothy Lovejoy
Replace the space with an underscore:
$ pbpaste | sort | uniq | tr " " "_"
Agnes_Skinner
Artie_Ziff
Cletus_Spuckler
Hank_Scorpio
Helen_Lovejoy
John_Frink
Kirk_Van_Houten
Nick_Riviera
Ruth_Powers
Seymore_Skinner
Timothy_Lovejoy
Then add the final part of the email address:
$ pbpaste | sort | uniq | tr " " "_" | sed 's/$/@simpsons.com/'
Agnes_Skinner@simpsons.com
Artie_Ziff@simpsons.com
Cletus_Spuckler@simpsons.com
Hank_Scorpio@simpsons.com
Helen_Lovejoy@simpsons.com
John_Frink@simpsons.com
Kirk_Van_Houten@simpsons.com
Nick_Riviera@simpsons.com
Ruth_Powers@simpsons.com
Seymore_Skinner@simpsons.com
Timothy_Lovejoy@simpsons.com
This looks perfect! We can now put the transformed text back onto the clipboard:
$ pbpaste | sort | uniq | tr ' ' '_' | sed 's/$/@simpsons.com' | pbcopy
All in all we have the following pipeline:
pbpaste- output the clipboardsort- order the outputuniq- deduplicate the rowstr ' ' '_'- replace spaces with underscoressed /$/@simpsons.com- add the email domain to the end of the row
Now you don't need to remember all of these commands. We'll be going into them in detail as the book continues, and in the next chapter we'll be looking into how you can get help directly in the shell to discover how commands work. The key concept is that you can treat the clipboard just like a file - reading from it, manipulating it, and writing back to it, without ever leaving the shell.
In fact - if you are on a Linux system, try running:
cat /dev/clipboard
You'll see the contents of the clipboard written out. In Linux almost everything can be represented as a file - the clipboard included! Like a lot of the other topics this is something we'll visit again in detail later.
We're also going to spend a lot of time later on looking at pipelines in detail, so don't worry too much if this seems overwhelming at this stage!
As you go through the book you'll be able to apply every technique you learn to the clipboard itself - hopefully you'll find this can save you a lot of time and make you even faster with your day to day work.
Summary
In this chapter we learnt:
- You can copy and paste into the shell with keyboard commands which are the same, or at least very similar, to the commands you normally use.
- Different operating systems access the clipboard in different ways, but we can work around this by creating an
aliascommand (which we'll see in detail later) - We can use
pbcopyto copy andpbpasteto paste. - We can 'chain' commands together with the
|(pipe) operator. - We can turn formatted text on the clipboard into plain text by just running
pbpaste | pbcopy. - We can sort lines of text with the
sortcommand. - There is clearly a lot more we can do with text as we save hints of with the
uniq,trandsedcommands - which we'll introduce in detail later. - You can treat the clipboard a bit like a file in the shell.
- On Linux, lots of things can be represented as files - including the clipboard (which is accessed via the
/dev/clipboardfile).